Robohub.org
Rapid prototyping of the strider robot – smoother, stronger, faster
 This summer we used our Strider optimizer coupled with rapid prototyping in LEGO to refine its 10-bar linkage.
In a tiny fraction of the time it took us to refine TrotBot’s linkage in our garage, we explored numerous variations of Strider’s linkage and their trade-offs, and were able to significantly improve its performance in these categories:
Gait Efficiency. To be energy efficient, walking gaits should be smooth and not cause the robot to rise and fall – think how much more tiring it is to do lunges than it is to simply walk. The feet should also move at constant speed – try walking while changing how quickly your feet sweep across the ground and your leg muscles will quickly complain! Strider Ver 3 was optimized for both of these features, and it’s the only mechanism that we’ve tested which can walk with a 1:1 gear ratio without the LEGO motors stalling:
Rugged Terrain. Like with TrotBot, we wanted Strider to be able to walk on rugged terrain, otherwise why not just use wheels? But, mechanical walkers are blind and dumb, and they can’t lift their feet to avoid tripping on obstacles. So we designed Strider’s foot-path to mimic how you would walk blindfolded on a path crisscrossed by roots: lift your feet high and keep them high until stepping back down to the ground, like this:
Here’s a rugged terrain test an 8-leg build:
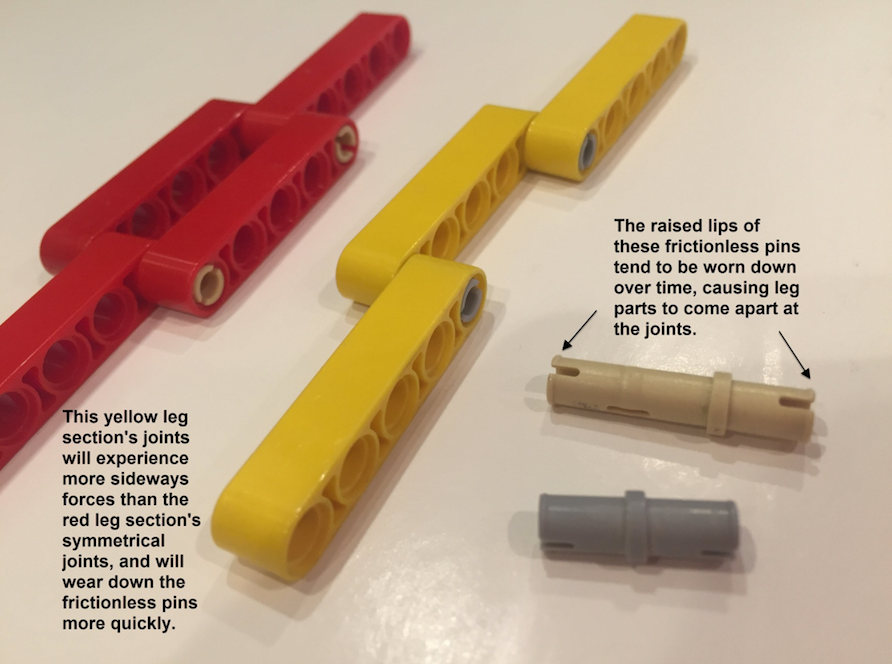
Strength. Walkers stress frames more than wheeled vehicles, so we increased the frame’s rigidity with more triangles. Also, the leverage of long legs can put a tremendous amount of force on the leg’s joints, especially when turning them tank-style. We strengthened Strider’s leg joints by sandwiching them between beams like in the image below, which also reduces how quickly friction wears down the lips of the frictionless pins.
Here’s a test of Strider’s strength with a 10 pound load:
We made these changes while keeping Strider simple – it’s still our easiest walker to build. We also (hopefully) made our building instructions more clear. We learned how bad we are at creating building instructions from Ben’s experience teaching his walking robots class last spring. In the past when users would email us about something confusing in the instructions, we’d simply add more pictures to clarify things. This backfired in Ben’s class, since more build pictures resulted in the students getting more confused, and caused them to skim thru the pictures more quickly, and to make more mistakes. As we learned, less is more!
We also separated the leg and frame instructions to make it easier to build different versions of Strider, and we designed the frame to make it easy to swap between the battery box/IR controller, or the EV3 brick. You can find the instructions here. Here’s an example build with the EV3 brick mounted underneath – but it would probably work with the brick mounted on top as well.
For the bold, we also posted a half dozen new variations of the Strider linkage for you to try building here, along with an online optimizer for the even bolder to create their own versions of the Strider linkage. We’ve also optimized Klann’s and Strandbeest’s linkages for LEGO, and you can find their online optimizers here. (jeez, I guess we’ve been busy)
Here’s a final teaser to encourage you (or your students) to take on the challenging task of replacing wheels with mechanical legs:


