
Robohub.org
Arduino for Makers #2: Deconstructing Arduino programs
 In this new tutorial series, robotics educator and author Myke Predko introduces you to the basics of Arduino with simple projects that can be created in just a few minutes with inexpensive and easy-to-obtain parts. In this tutorial, Myke dives into how to program your Arduino so that you can plan an effective software architecture and monitor your application. Look for new tutorials every 2-3 weeks, or see all the tutorials in this series here.
Welcome back. In this article, I want to discuss some of the particulars of programming an Arduino so that you better understand what is happening when your program is built. I’ll also discuss how to best architect your software. The Arduino software approach is somewhat unusual compared to other devices and, for beginners at least, takes away the need to do the high level design of the application. As a result, there are a few things to understand and keep in the back of your mind if you want your application to run without anything unexpected happening. In this article, I will provide you with a couple of simple applications to illustrate how Arduino software works, as well as a way to monitor the operation of the application.
In case you found the opening paragraph ominous and were wondering the Arduino is a potential minefield when it comes to software development, let me reassure you that it is as easy to program as any other device I’ve worked with and has been designed to allow for very sophisticated applications. It balances the needs of the beginner and expert application developer quite nicely.
When you’re creating with real time applications (applications that respond to different inputs), the common basic architecture is:
- System Initialization (“setup()”)
- Define and initialize system and state variables
- Setup hardware interfaces
- Repeat input/output processing code (“loop()”)
- Get inputs
- Process inputs with/update system and state variables
- Drive outputs
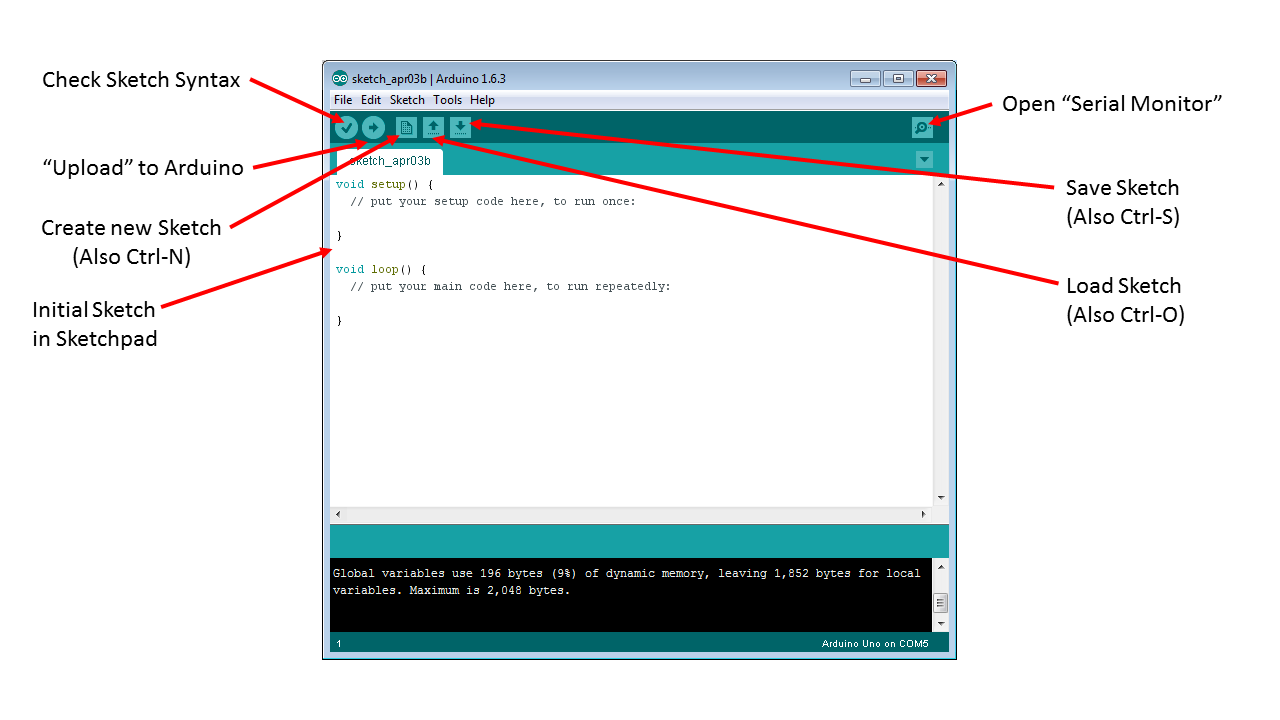
The Arduino development software eliminates the need to come up with this program type, instead using the “setup()” and “loop()” methods, which provide this capability for you. As can be seen in Figure 1, when you first start the Arduino development tool or start a new “sketch” .ino (which I usually hear called an “ee-no”) file, the basic code with “setup()” and “loop()”are created – it is now up to you to put in the code for these two methods.
You may have heard that Arduino programming is really C++. However, when you compare example C++ programs to the Arduino .ino code, you will find that though there are some similarities, they really don’t look the same. This is because the .ino code is appended to the end of the C++ file containing the following “main()”:
#include <Arduino.h>

void setup();
void loop();

int main(void)
{
 setup();

#if defined(USBCON)
USBDevice.attach();
#endif

setup();
for (;;) {
  loop();
  if (serialEventRun) serialEventRun();
 }
 return 0;
}

// user .ino file is appended here
In the “main()” code, you can see the calls to the “setup()” and “loop()” methods, along with a few other pieces that need to be explained.
The first is the “#include <Arduino.h>” statement, in which the basic operations provided by the Arduino system are defined. “#include” statements copy in the contents of the specified file before the file is compiled.
Next are the “USBCON” and “USBDevice” statements. These are required if an Arduino USB Host Shield is used in the application. An Arduino USB Host Shield is a shield that enables the Arduino application to be augmented with USB hubs, keyboards, mice, joysticks, thumb drives and other devices.
We will be discussing the “for” statement and looping in a later article, but I wanted to point out that the “for(;;)” statement is a way of creating an infinite loop. When execution reaches this statement, the statements inside the curly braces (“{“ & “}”) that follow will be repeated as long as the Arduino is running.
I will discuss the “Serial Events” in a bit more detail below, but its purpose is to poll the Arduino’s serial communications hardware and perform any necessary operations. This is an important function for helping you to understand how your application is working.
Finally, the “return 0;” statement is put there as a matter of form – execution will never reach it because of the infinite loop above it. Many compilers will flag a warning or an error if a return statement is not at the end of your code, so putting it in will avoid this potential problem.
To demonstrate the operation of the “setup()” and “loop()” methods, I created the Console_Test application, which you can copy and paste into the Arduino development system:
// Console_Test - Message from "setup()" and "loop()"
//
// myke predko
void setup() {
 Serial.begin(9600);       // Initialize Serial Library
 Serial.println("Hello world!"); // Output with New Line
}

void loop() {
 Serial.println("Loop Line"); // Output with New Line
}
This application performs the following actions:
- Enables “Serial Events”, and outputs a message indicating that it is up and running
- Every time the “loop()” method is called, outputs a message
To test out this application, start up the Arduino development system and copy the following statements into “setup()”:
Serial.begin(9600);       // Initialize Serial Library
Serial.println("Hello world!"); // Output with New Line
and the following statement into “loop()”:
Serial.println("Loop Line"); // Output with New Line
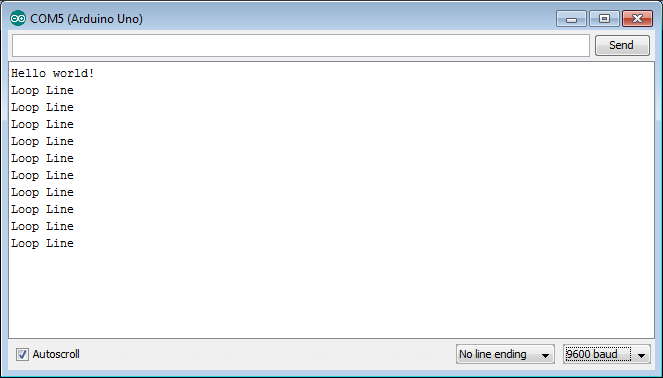
Next, save the sketch as “Console_Test” and then transfer it to your Arduino using the “Upload” button shown in Figure 1. To see the application running and outputting the messages, click on the “Open Serial Monitor” button at the top right corner of Figure 1. After a few seconds, the Arduino will reset and restart running the application. You will see a display like Figure 2 for a second or so … at least until the repeating “Loop Line” messages cause the “Hello World!” message to scroll off the screen.
The “Serial.begin” statement loads in and starts (“instantiates” in Object Orientated speak) the “Serial” object, which is used for serial communications between the Arduino’s processor and the host PC. Serial communications are set at 9,600 bits per second (bps), which is actually 960 bytes per second (as ten bits are required for sending each byte of data). The “Serial.println” statements send the included string of characters to the host PC.
Serial Events are a great way to show that your application is working and to provide instructions to the Arduino during operation, but there are a couple of things to be wary of.
If you look at the “main()” code above, you will see that Serial Events only execute after a “loop()” operation. In the Arduino, Serial Events are not interrupt-driven; the receive buffer is only checked after a “loop()” and while the send buffer is being transmitted. The hardware receive registers in the ATMega, the processor used in the Arduino, can really only store one byte at a time safely, so the “loop()” code must execute in less time than it takes to receive a single byte (which is 10.4 milliseconds). This is not a major issue but it does mean that you should make your “loop()” code execute as quickly as possible – this is especially true if you work at higher speeds. Normally, I like to have communications at a minimum of 115,200 bps, which means that if I were to run at this communications speed in an Arduino, my “loop()” code must always execute in less than 87 microseconds to avoid the possibility of losing characters.
When you’re starting out, running Arduino “Serial” communications at 9,600 bits per second will probably be fast enough for most applications. As long as you don’t have long delays in your “loop()” code, you should not have any issues.
The second potential issue to watch for is the size of the “Serial” send and receive buffers, which are only 64 bytes in size. These are in software, and are independent of the hardware registers. Sending a message longer than 64 bytes will result in parts of it being “truncated” (cut off) and allowing the receive buffer to grow beyond 64 bytes will result in incoming data being lost. This may seem like an unlikely occurrence, but it can happen if all the bytes in the send message(s) in “setup()” are longer than 64 bytes, as they aren’t sent until “loop()” is first executed. It is possible to increase the size of the “Serial” send and receive buffers, but with a bit of care in your programs, there will be no need to.
While it is not important at this point in time, everything that is loaded into the Arduino is built during the transfer operation. This includes “Libraries” and any other code that you want to bring in to your Sketches. The advantage of doing this is to avoid the need for separate build processes; it also allows the code to be modified easily. You may notice that the time the Arduino development tool takes to compile your application seems unreasonably long – that is because it is going out and getting all possible library and include file code, and compiling it along with your application before building an executable with only the necessary pieces.
I realize that there is a lot of information here. It can all be boiled down to the following statements for the beginning user:
- Application setup is put in “setup()”
- Repeating code for the application is put in “loop()” and must execute as quickly as possible
- “Serial” is used for providing information about the execution of a program
… but, I wanted to provide background information for individuals who may have had some programming experience on different platforms and wanted to understand how the Arduino works “behind the curtains”. For completely new users, I’m hoping that the information here will help you when you start doing your own applications and things go a bit wonky.
Example Programs:
Next Article: Arduino Integer Data Types
Websites for Further Reading:
- http://arduino.cc/en/Hacking/BuildProcess “Aduino Build Process” explaining the nuts and bolts of how things go together
- https://code.google.com/p/arduino/wiki/BuildProcess A practical explanation of how the build process works
- http://arduino.cc/en/Hacking/Bootloader?from=Tutorial.Bootloader Arduino Bootloader description and information
- http://arduino.cc/en/reference/libraries Arduino Libraries
- http://www.instructables.com/id/HOW-TO-use-the-ARDUINO-SERIAL-MONITOR/ How-To use the Arduino Serial Monitor
- http://arduino.cc/en/Main/ArduinoUSBHostShield Arduino USB Host Shield
tags: Arduino for Makers, Arduino tutorial, c-Education-DIY, tutorial