
Robohub.org
Building a python toolbox for robot behavior
If you’ve been subject to my posts on Twitter or LinkedIn, you may have noticed that I’ve done no writing in the last 6 months. Besides the whole… full-time job thing … this is also because at the start of the year I decided to focus on a larger coding project.
At my previous job, I stood up a system for task and motion planning (TAMP) using the Toyota Human Support Robot (HSR). You can learn more in my 2020 recap post. While I’m certainly able to talk about that work, the code itself was closed in two different ways:
- Research collaborations with Toyota Research Institute (TRI) pertaining to the HSR are in a closed community, with the exception of some publicly available repositories built around the RoboCup@Home Domestic Standard Platform League (DSPL).
- The code not specific to the robot itself was contained in a private repository in my former group’s organization, and furthermore is embedded in a massive monorepo.
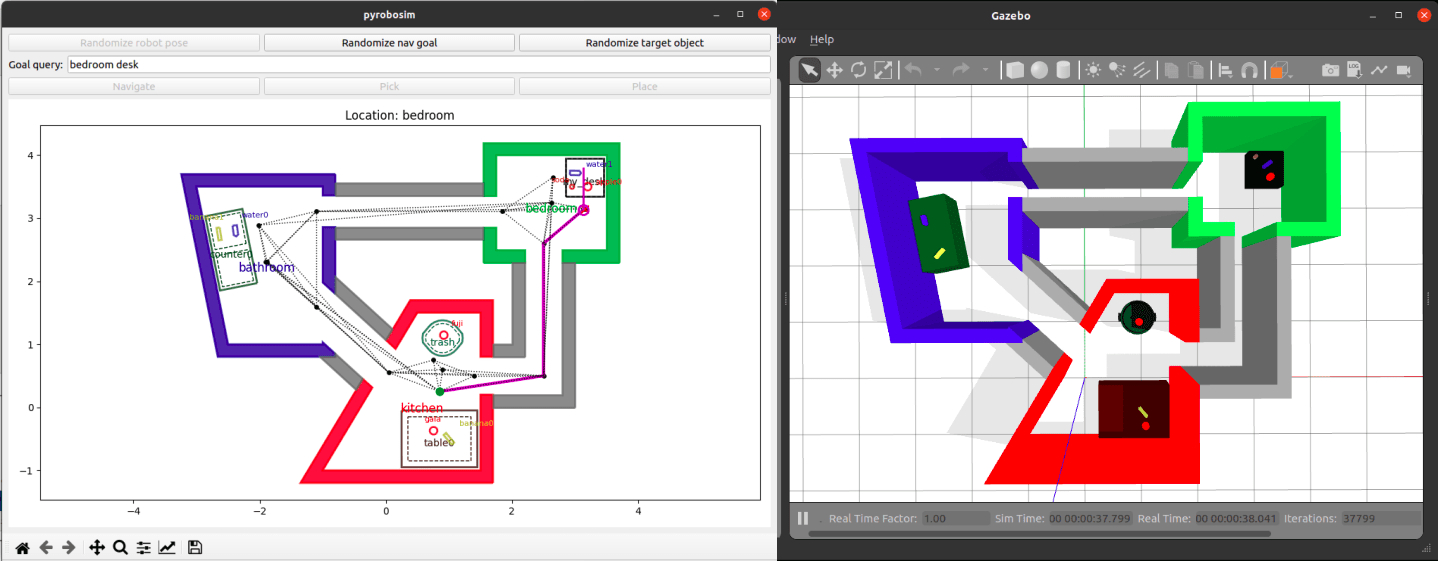
Rewind to 2020: The original simulation tool (left) and a generated Gazebo world with a Toyota HSR (right).
So I thought, there are some generic utilities here that could be useful to the community. What would it take to strip out the home service robotics simulation tools out of that setting and make it available as a standalone package? Also, how could I squeeze in improvements and learn interesting things along the way?
This post describes how these utilities became pyrobosim: A ROS2 enabled 2D mobile robot simulator for behavior prototyping.
What is pyrobosim?
At its core, pyrobosim is a simple robot behavior simulator tailored for household environments, but useful to other applications with similar assumptions: moving, picking, and placing objects in a 2.5D* world.
* For those unfamiliar, 2.5D typically describes a 2D environment with limited access to a third dimension. In the case of pyrobosim, this means all navigation happens in a 2D plane, but manipulation tasks occur at a specific height above the ground plane.
The intended workflow is:
- Use pyrobosim to build a world and prototype your behavior
- Generate a Gazebo world and run with a higher-fidelity robot model
- Run on the real robot!
Pyrobosim allows you to define worlds made up of entities. These are:
- Robots: Programmable agents that can act on the world to change its state.
- Rooms: Polygonal regions that the robot can navigate, connected by Hallways.
- Locations: Polygonal regions that the robot cannot drive into, but may contain manipulable objects. Locations contain one of more Object Spawns. This allows having multiple object spawns in a single entity (for example, a left and right countertop).
- Objects: The things that the robot can move to change the state of the world.
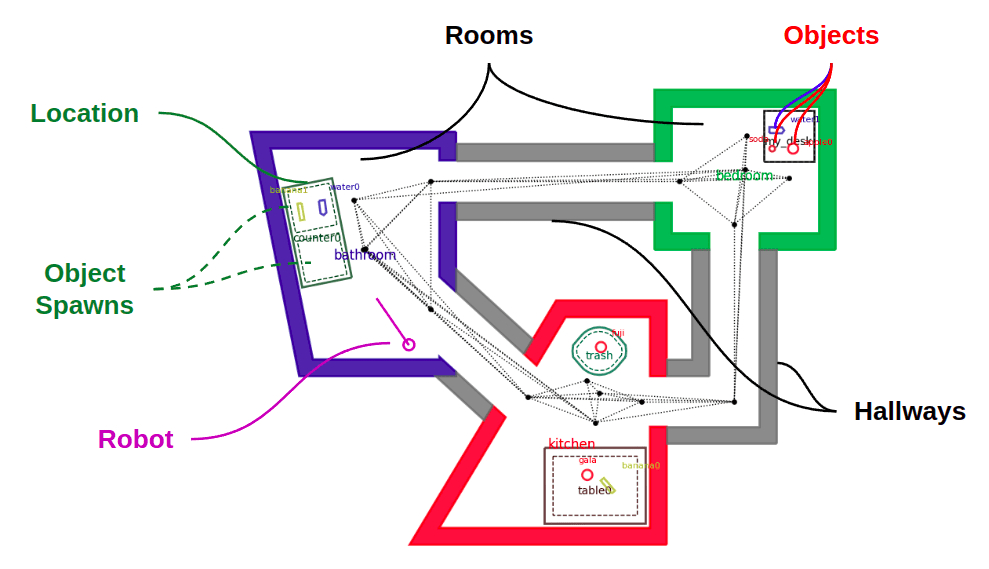
Main entity types shown in a pyrobosim world.
Given a static set of rooms, hallways, and locations, a robot in the world can then take actions to change the state of the world. The main 3 actions implemented are:
- Pick: Remove an object from a location and hold it.
- Place: Put a held object at a specific location and pose within that location.
- Navigate: Plan and execute a path to move the robot from one pose to another.
As this is mainly a mobile robot simulator, there is more focus on navigation vs. manipulation features. While picking and placing are idealized, which is why we can get away with a 2.5D world representation, the idea is that the path planners and path followers can be swapped out to test different navigation capabilities.
Another long-term vision for this tool is that the set of actions itself can be expanded. Some random ideas include moving furniture, opening and closing doors, or gaining information in partially observable worlds (for example, an explicit “scan” action).
Independently of the list of possible actions and their parameters, these actions can then be sequenced into a plan. This plan can be manually specified (“go to A”, “pick up B”, etc.) or the output of a higher-level task planner which takes in a task specification and outputs a plan that satisfies the specification.

Execution of a sample action sequence in pyrobosim.
In summary: pyrobosim is a software tool where you can move an idealized point robot around a world, pick and place objects, and test task and motion planners before moving into higher-fidelity settings — whether it’s other simulators or a real robot.
What’s new?
Taking this code out of its original resting spot was far from a copy-paste exercise. While sifting through the code, I made a few improvements and design changes with modularity in mind: ROS vs. no ROS, GUI vs. no GUI, world vs. robot capabilities, and so forth. I also added new features with the selfish agenda of learning things I wanted to try… which is the point of a fun personal side project, right?
Let’s dive into a few key thrusts that made up this initial release of pyrobosim.
1. User experience
The original tool was closely tied to a single Matplotlib figure window that had to be open, and in general there were lots of shortcuts to just get the thing to work. In this redesign, I tried to more cleanly separate the modeling from the visualization, and properties of the world itself with properties of the robotic agent and the actions it can take in the world.
I also wanted to make the GUI itself a bit nicer. After some quick searching, I found this post that showed how to put a Matplotlib canvas in a PyQT5 GUI, that’s what I went for. For now, I started by adding a few buttons and edit boxes that allow interaction with the world. You can write down (or generate) a location name, see how the current path planner and follower work, and pick and place objects when arriving at specific locations.
In tinkering with this new GUI, I found a lot of bugs with the original code which resulted in good fundamental changes in the modeling framework. Or, to make it sound fancier, the GUI provided a great platform for interactive testing.
The last thing I did in terms of usability was provide users the option of creating worlds without even touching the Python API. Since the libraries of possible locations and objects were already defined in YAML, I threw in the ability to author the world itself in YAML as well. So, in theory, you could take one of the canned demo scripts and swap out the paths to 3 files (locations, objects, and world) to have a completely different example ready to go.
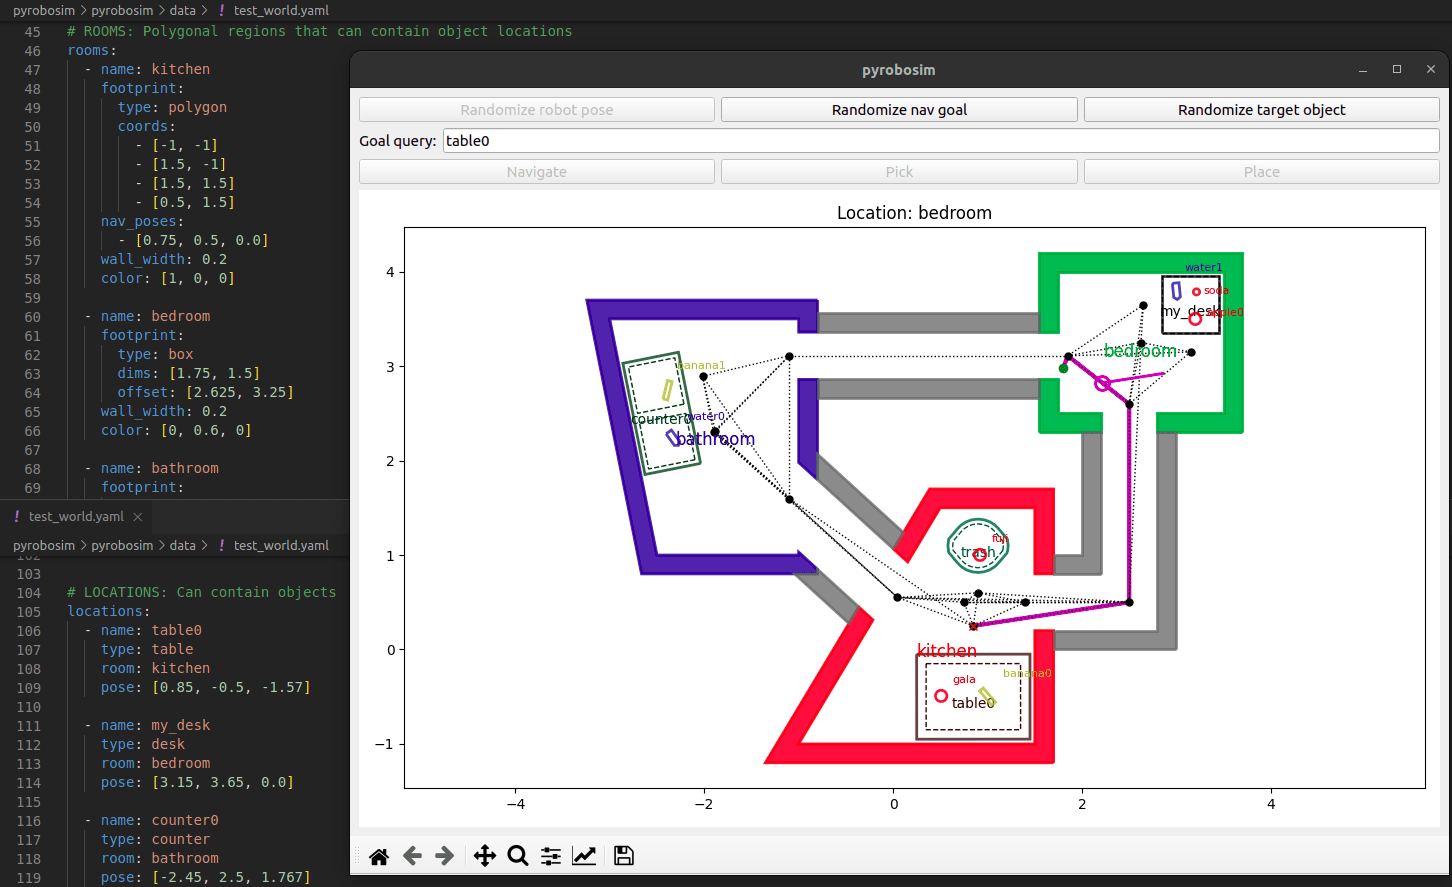
pyrobosim GUI with snippets of the world YAML file behind it.
2. Generalizing motion planning
In the original tool, navigation was as simple as possible as I was focused on real robot experiments. All I needed in the simulated world was a representative cost function for planning that would approximate how far a robot would have to travel from point A to point B.
This resulted in building up a roadmap of (known and manually specified) navigation poses around locations and at the center of rooms and hallways. Once you have this graph representation of the world, you can use a standard shortest-path search algorithm like A* to find a path between any two points in space.
This time around, I wanted a little more generality. The design has now evolved to include two popular categories of motion planners.
- Single-query planners: Plans once from the current state of the robot to a specific goal pose. An example is the ubiquitous Rapidly-expanding Random Tree (RRT). Since each robot plans from its current state, single-query planners are considered to be properties of an individual robot in pyrobosim.
- Multi-query planners: Builds a representation for planning which can be reused for different start/goal configurations given the world does not change. The original hard-coded roadmap fits this bill, as well as the sampling-based Probabilistic Roadmap (PRM). Since multiple robots could reuse these planners by connecting start and goal poses to an existing graph, multi-query planners are considered properties of the world itself in pyrobosim.
I also wanted to consider path following algorithms in the future. For now, the piping is there for robots to swap out different path followers, but the only implementation is a “straight line executor”. This assumes the robot is a point that can move in ideal straight-line trajectories. Later on, I would like to consider nonholonomic constraints and enable dynamically feasible planning, as well as true path following which sets the velocity of the robot within some limits rather than teleporting the robot to ideally follow a given path.
In general, there are lots of opportunities to add more of the low-level robot dynamics to pyrobosim, whereas right now the focus is largely on the higher-level behavior side. Something like the MATLAB based Mobile Robotics Simulation Toolbox, which I worked on in a former job, has more of this in place, so it’s certainly possible!
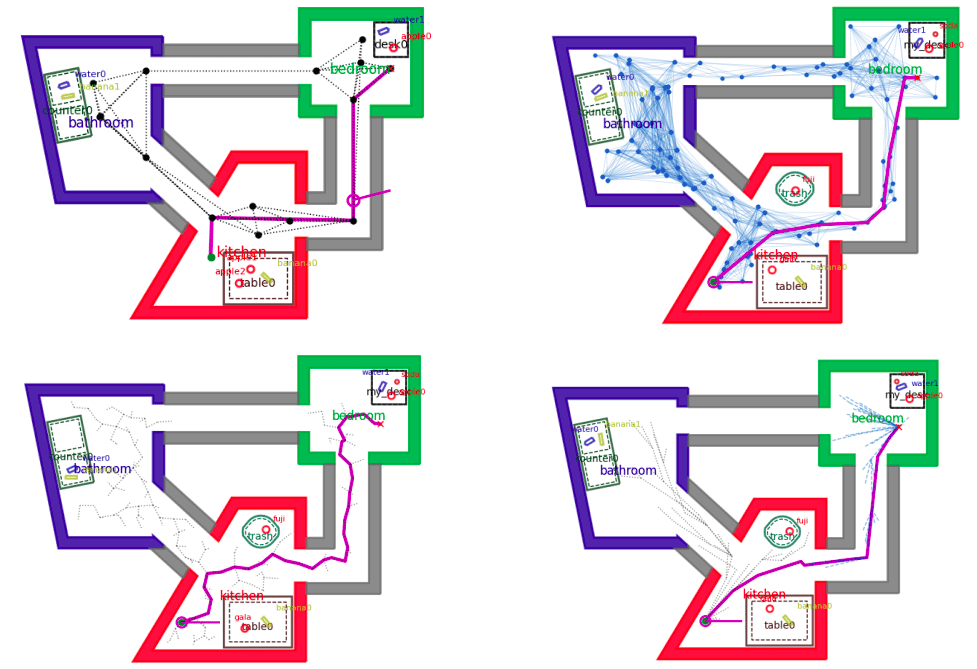
Sample path planners in pyrobosim.
Hard-coded roadmap (upper left), Probabilistic Roadmap (PRM) (upper right).
Rapidly-expanding Random Tree (RRT) (lower left), Bidirectional RRT* (lower right).
3. Plugging into the latest ecosystem
This was probably the most selfish and unnecessary update to the tools. I wanted to play with ROS2, so I made this into a ROS2 package. Simple as that. However, I throttled back on the selfishness enough to ensure that everything could also be run standalone. In other words, I don’t want to require anyone to use ROS if they don’t want to.
The ROS approach does provide a few benefits, though:
- Distributed execution: Running the world model, GUI, motion planners, etc. in one process is not great, and in fact I ran into a lot of snags with multithreading before I introduced ROS into the mix and could split pieces into separate nodes.
- Multi-language interaction: ROS in general is nice because you can have for example Python nodes interacting with C++ nodes “for free”. I am especially excited for this to lead to collaborations with interesting robotics tools out in the wild.
The other thing that came with this was the Gazebo world exporting, which was already available in the former code. However, there is now a newer Ignition Gazebo and I wanted to try that as well. After discovering that polyline geometries (a key feature I relied on) was not supported in Ignition, I complained just loudly enough on Twitter that the lead developer of Gazebo personally let me know when she merged that PR! I was so excited that I installed the latest version of Ignition from source shortly after and with a few tweaks to the model generation we now support both Gazebo classic and Ignition.
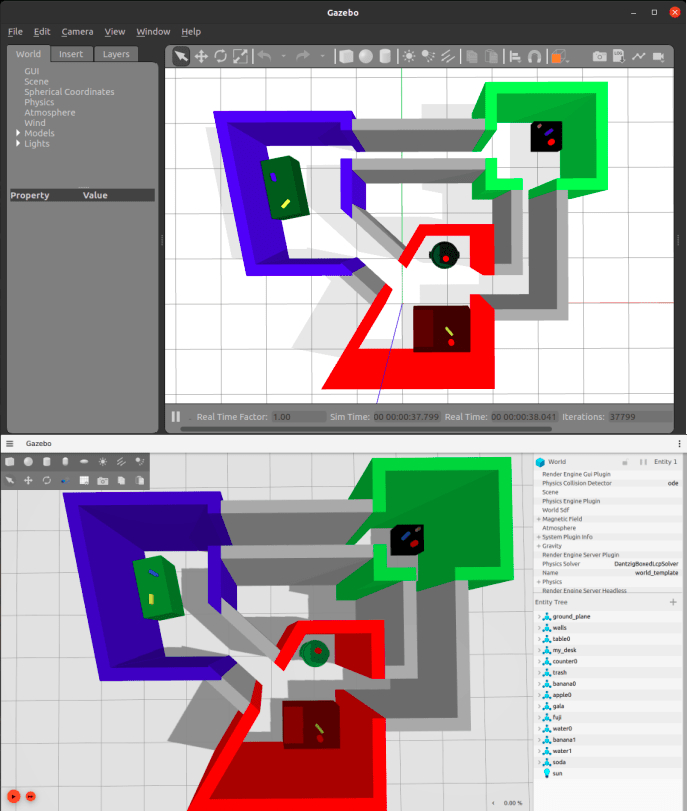
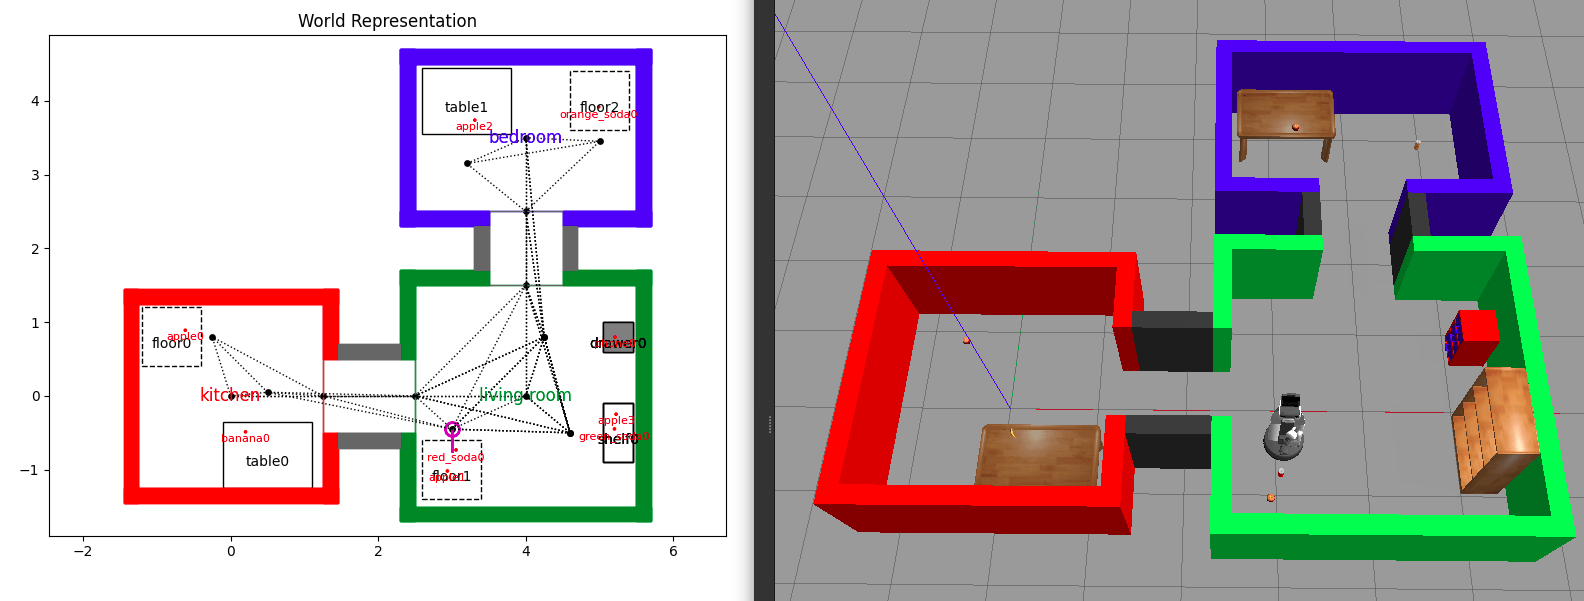
pyrobosim test world exported to Gazebo classic (top) and Ignition Gazebo (bottom).
4. Software quality
Some other things I’ve been wanting to try for a while relate to good software development practices. I’m happy that in bringing up pyrobosim, I’ve so far been able to set up a basic Continuous Integration / Continuous Development (CI/CD) pipeline and official documentation!
For CI/CD, I decided to try out GitHub Actions because they are tightly integrated with GitHub — and critically, compute is free for public repositories! I had past experience setting up Jenkins (see my previous post), and I have to say that GitHub Actions was much easier for this “hobbyist” workflow since I didn’t have to figure out where and how to host the CI server itself.
Documentation was another thing I was deliberate about in this redesign. I was always impressed when I went into some open-source package and found professional-looking documentation with examples, tutorials, and a full API reference. So I looked around and converged on Sphinx which generates the HTML documentation, and comes with an autodoc module that can automatically convert Python docstrings to an API reference. I then used ReadTheDocs which hosts the documentation online (again, for free) and automatically rebuilds it when you push to your GitHub repository. The final outcome was this pyrobosim documentation page.
The result is very satisfying, though I must admit that my unit tests are… lacking at the moment. However, it should be super easy to add new tests into the existing CI/CD pipeline now that all the infrastructure is in place! And so, the technical debt continues building up.
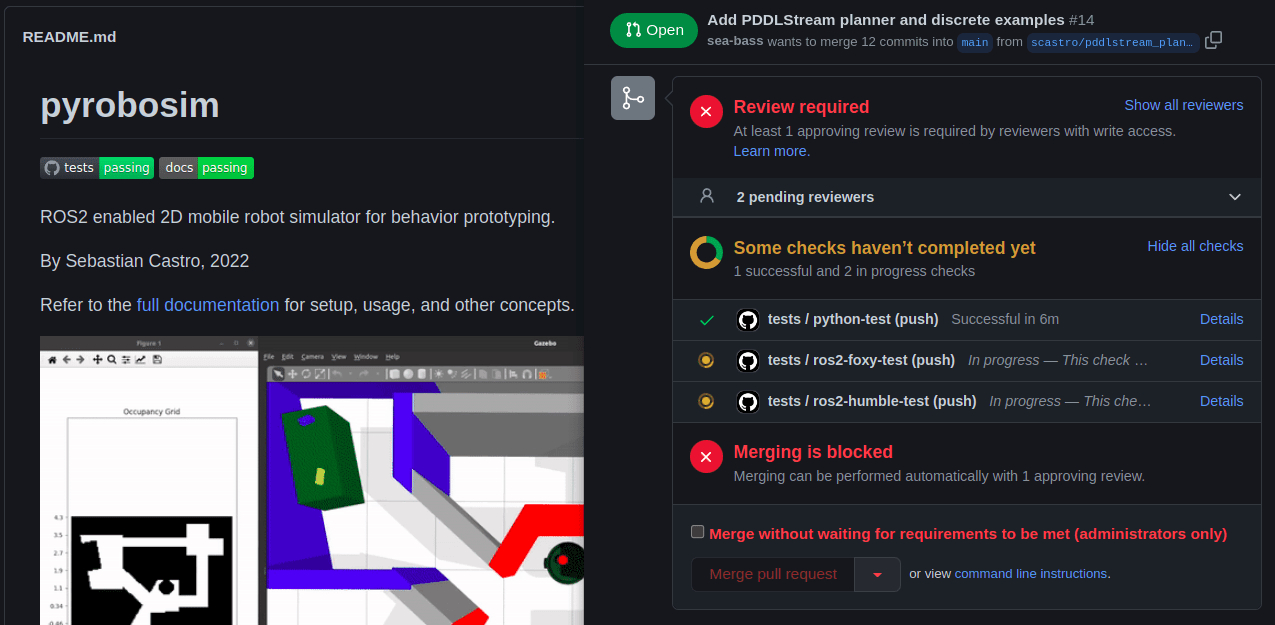
pyrobosim GitHub repo with pretty status badges (left) and automated checks in a pull request (right).
Conclusion / Next steps
This has been an introduction to pyrobosim — both its design philosophy, and the key feature sets I worked on to take the code out of its original form and into a standalone package (hopefully?) worthy of public usage. For more information, take a look at the GitHub repository and the official documentation.
Here is my short list of future ideas, which is in no way complete:
- Improving the existing tools: Adding more unit tests, examples, documentation, and generally anything that makes the pyrobosim a better experience for developers and users alike.
- Building up the navigation stack: I am particularly interested in dynamically feasible planners for nonholonomic vehicles. There are lots of great tools out there to pull from, such as Peter Corke’s Robotics Toolbox for Python and Atsushi Sakai’s PythonRobotics.
- Adding a behavior layer: Right now, a plan consists of a simple sequence of actions. It’s not very reactive or modular. This is where abstractions such as finite-state machines and behavior trees would be great to bring in.
- Expanding to multi-agent and/or partially-observable systems: Two interesting directions that would require major feature development.
- Collaborating with the community!
It would be fantastic to work with some of you on pyrobosim. Whether you have feedback on the design itself, specific bug reports, or the ability to develop new examples or features, I would appreciate any form of input. If you end up using pyrobosim for your work, I would be thrilled to add your project to the list of usage examples!
Finally: I am currently in the process of setting up task and motion planning with pyrobosim. Stay tuned for that follow-on post, which will have lots of cool examples.
You can read the original article at Roboticseabass.com.


