
Robohub.org
Installing and running time synchronization, with chrony

Time synchronization diagram.
Time synchronization affects many robots. Robots have more computers and sensors, so keeping everything in sync is important. Trying to look through log files where all of the times are skewed is not fun and makes processing difficult. Merging sensor data together with GPS can also be disastrous if the times are offset. Further complicating time synchronization is that the robots are often not connected to the internet, so utilizing public time servers will not work.
My preferred tool for time synchronization is chrony. Chrony is based on NTP, but performs better when not connected to the internet and has smoother clock adjustments, plus, is easier to get GPS and PPS signals into.
Installing time synchronization
If you are using GPS as your time source the first step is to wire the GPS to a serial port on your computer. If you want to use PPS make sure your GPS has a PPS output, such as the Garmin 16x or 18x). For wiring, I use the standard pins of 2,3 & 5 (GPS tx, GPS rx, ground) for RS-232 DB-9 serial connections, then I run the PPS line into pin 1 of the DB9 connector. I have not tried it, but I assume the GPS with no PPS would work via USB.
There are 2 methods to installing chrony that I use:
1. If a PPS (pulse per second) input is being used (such as from a GPS receiver), then we need to build chrony from source:
- git clone git://www.linuxpps.org/git/pps-tools pps-tools to get timepps.h.
- From chrony install manual
If a ‘timepps.h’ header is available (e.g. from the LinuxPPS project), chronyd will be built with PPS API reference clock driver. If the header is installed in a location that isn’t normally searched by the compiler, you can add it to the searched locations by setting CPPFLAGS variable to -I/path/to/timepps. - Then git clone git://git.tuxfamily.org/gitroot/chrony/chrony.git
run .configure, make all, and make install - I needed to run sudo apt-get install bison to get it the make all to compile
That should give you chrony with pps support!
2. If no PPS input is being used (this is the easy option):
- sudo apt-get install chrony
Now, we need to install the GPS driver. For this I use GPSD. Using GPSD is nice because it is easy and allows you to run a GPSD client that listens to the GPS, so you can also use the position for your robot. GPSD is needed to allow clients to use the GPS that is connected to one serial port.
To install GPSD:
- sudo apt-get install gpsd
The config file in /etc/default/gps should be edited using the dpkg command to set baud rate and the port of the GPS device.
We now need to edit the chrony config file /etc/crony/crony.cong on the main computer:
- If the robot will ever connect to the internet:
Modify the existing server lines to say offline right after the server name. ex. server SERVER_NAME offline - If the robot will never touch (figuratively) the internet:
Delete (or comment) all of the server lines
Now here are some settings I change:
# Stop bad estimates upsetting machine clock.
maxupdateskew 100.0
I see many people also comment out dumponexit. I am not entirely sure why.
There are 2 ways to add the GPS/PPS:
https://chrony.tuxfamily.org/manual.html
https://chrony.tuxfamily.org/doc/2.3/manual.html#refclock-directive
1:
# add socket with small delay for PPS
refclock SOCK /var/run/chrony.sock offset 0.002 delay 1e-4 refid SOCK
makestep 0.1 5
maxupdateskew 100.0
set stratum local stratum 6
2:
refclock PPS /dev/pps0 lock NMEA
refclock SHM 0 offset 0.5 delay 0.2 refid NMEA noselect
On any secondary computers that need to sync with the main computer here is what I do
Remove all existing servers and then add our server:
makestep -1 100
# replace IP below with your server
server 192.168.10.2 minpoll 1 maxpoll 2
I see many people also comment out dumponexit. I am not entirely sure why.
Running time synchronization
1. Start GPS Daemon: sudo gpsd -n -N -D2 /dev/ttyS0 Changing /dev/ttySx for the port you can GPS connected to
- You should see a bunch of lines such as: gpsd:INFO PPS cycle…
- This can also be run from an init.d script
2. Running chrony: sudo /etc/init.d/chrony start
The two commands I use most for debugging and checking status are chronyc tracking and chronyc sources.
- The tracking command shows how good your current time is and what the offset of your system clock is.
- The sources command shows information about which sources are available, their status, and when they last were checked. If you are connected to the internet you will see a bunch of servers. If you are just connected to GPS and PPS you will just see those sources.
- A good reference for the commands above is here.
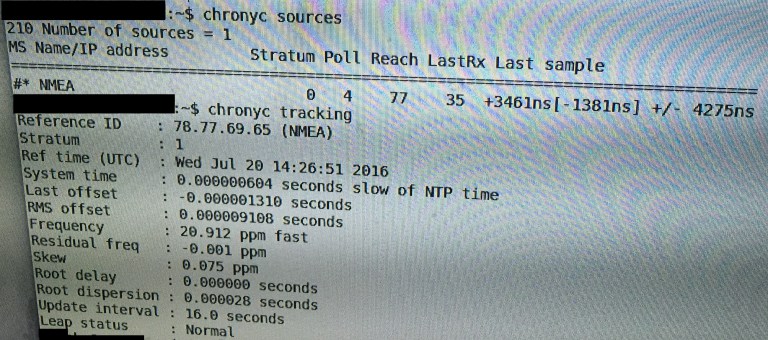
Output of tracking and sources command for chrony while using GPS. If PPS was enabled it would also show as a source. Source: Wikipedia Commons
One thing to be aware of is that with just GPS and no internet time servers I often see it can take 10 minutes for the chrony server to enter online mode. When checking any status such as cronyc sources you get an error saying 506 Cannot talk to daemon. After connecting to an internet time server or waiting about 10 minutes chrony will come online and start working.
I know there is a lot of detail above, and you might need to tweak things for your application, but I hope it help and you can look back as a reference.
The post chrony with GPS for Time Synchronization – Kicks NTP’s A$$ appeared first on Robots For Roboticists.
tags: c-Education-DIY

AUAI is supported by: