
Robohub.org
Arduino for Makers #0: Introduction to the series
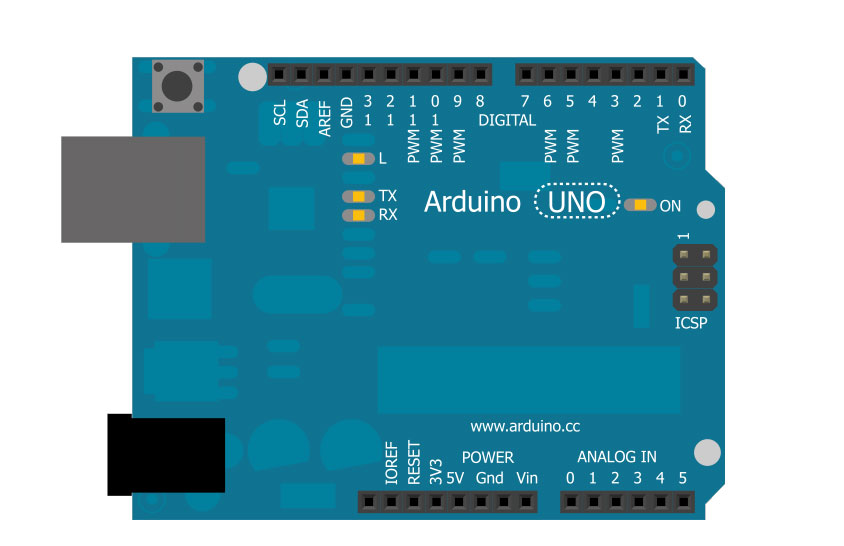
Arduinio Pinouts
In this new tutorial series, robotics educator and author Myke Predko will introduce you to the basics of Arduino with simple projects that can be created in just a few minutes with inexpensive and easy-to-obtain parts. Along the way, you will learn how to get the most out of electronics, how to create software that is easy to understand and debug, and you will develop the toolset you need to determine whether or not the Arduino is the right choice for your own project, and if so, how to implement it efficiently.
The series is for anyone interested in Arduino, from high school students to professional engineers. In this introduction, Myke gives an overview of the benefits – and limitations – of using Arduino for your project. Look for new tutorials every 2-3 weeks.
People who know me know that I have a love-hate relationship with Arduino.
The Arduino concept is brilliant: it’s a very low-cost open source and open hardware platform that is quick and easy to connect to. Arduino is very flexible: software applications use “C” syntax for commonality and are easy to enhance with “libraries” for specific interfaces and Input/Output (IO) devices. The development tools are available for just about every system out there and they do provide extension paths for the development tools. There are a number of different Arduino devices, each with different features that optimize them for different applications as well as a plethora of “shields” that allow users to hook up various devices quickly and (for the most part) easily.
These core features and philosophies have resulted in Arduino becoming the de facto standard for intelligent projects – there are so many well-documented Arduino projects out there that if you’re not comfortable with programming, chances are you will be able to find a project that uses the exact same (or at least very similar and easily changeable) devices as the ones you would like to use. Nobody could ever fault you for starting your project with an Arduino.
On the other side of the equation, there are some things I dislike about Arduino, however: its 8-bit processor, its schizophrenic design tools, its inability to do meaningful application debug, and the expectation on the part of many new developers that using Arduino means they are 80% of the way towards having a product ready for market.
To expand on these issues:
- In 2015, nothing should be controlled by an 8-bit processor. If you take a quick look at Digi-Key, you will find 32-bit Cortex M series processors from a variety of manufacturers that have more memory and peripherals while running a considerably faster speeds for the same cost (or less) than the ATmega used in the Arduino. I’m pointing out the Cortex processors (that, I should point out, are being used in the Arduino Duo board) because code can be passed between devices, giving a lot more freedom when choosing devices for a given application (which would extend the “open source”, “open hardware” concept even further).
- The standard Arduino development tool was designed for both the new user as well as the experienced one, and I don’t think it is well suited for anybody. I believe that a new developer should have as simple a development tool as possible, with only the required controls in front of them. As an experienced programmer, I revel in using Eclipsed-based development tools where I have 500+ options at my disposal.
- Going with my comment regarding the widespread availability of 32-bit processors, I also feel that the lack of a source code level debugger with stepping and breakpoints is a serious deficiency in the Arduino. These are features that I have been working with for more than thirty years, and I consider this to be a major oversight. In this tutorial series, I will share techniques that will help you understand and debug your Arduino applications.
- Just about every Arduino presentation I have ever seen has stated that one of its advantages is that it can be used in commercial products. To test out this assertion, I googled “Arduino used in commercial products,” and much to my surprise, I discovered that almost all the top ranked websites focused on why Arduino isn’t used in commercial products.
There is one notable exception to Arduino’s not being used in commercial products “as is” – and that is 3D printers. There are many shields available that make the interfacing to the different components of a 3D printer (the extruder, filament feed and movement motors) very easy, and it is the mechanical components where the primary differentiators lie (most use the same types of electrical components and standard, open source software). Along with the large (and generally boxy) shape of 3D printers, it doesn’t make sense to use anything else to control them.
There are currently 24 Arduino boards to choose from, each with a different processor running at a different speed, having varying memory and unique input/output (IO) pin configurations. The range is quite remarkable, with many boards providing the basic socket connections of the original Arduino “Uno” layout shown in the image at the start of this article. Other Arduino boards provide different built-in IO connections or physical layout (the LilyPad Arduino is designed to be stitched into clothing). In the list of reference websites below, I’ve included the Arduino page listing all the different types of “standard” Arduinos that are available.
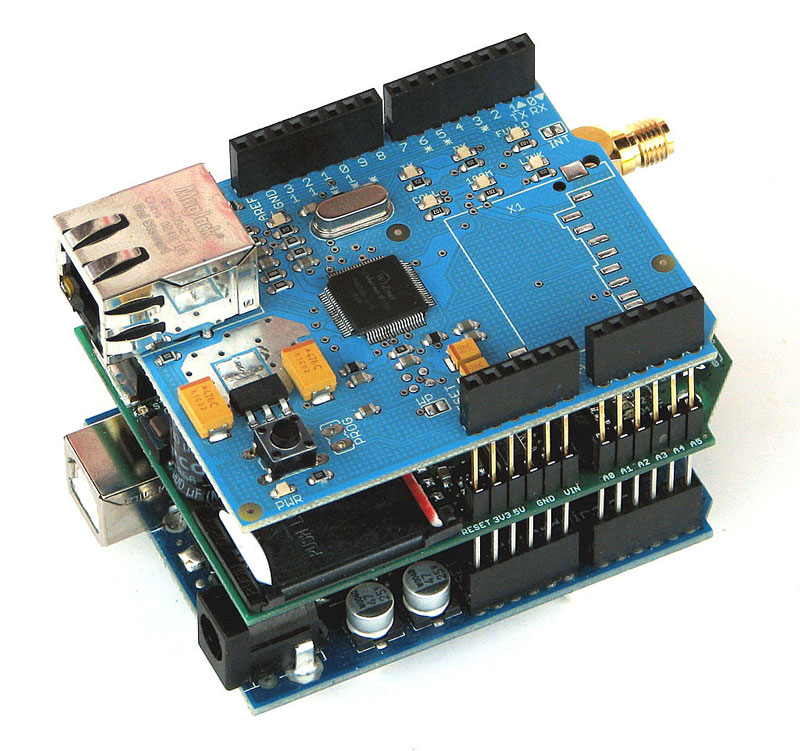
Arduino shields
One aspect that makes Arduino very exciting for me is the many different “shields” that are available for it. An Arduino “shield” is simply a PCB that is designed to plug into the Arduino Uno sockets and access specific pins for specific purposes. The different shields enhance the IO capabilities of the Arduino, and make creating an application a lot easier and faster. Unfortunately there is a downside: the need to allocate the IO pins used in order to ensure that multiple shields don’t use the same IO pins for the same functions. I’ll discuss this issue more in future posts.
I’ve numbered this first tutorial #0 for a reason: I want to set the stage (and some boundaries) for this series and share my own personal philosophies that will guide the materials and projects we will cover together. The Arduino is a great product with a large mass of resources and people behind it, but I want to get you to think about the Arduino as a part of your introduction to programming, electronics and robotics, so that you can understand its limitations and, hopefully, some day look beyond it create your own “big idea”.
One thing that has always really annoyed me are projects that require specialized parts that are limited in availability (usually because the author has a bunch of them he wants to sell). All the projects here will use standard parts available from reputable distributors. While I know I’ll be doing some junkbox applications, I’ll make sure that the descriptions of the parts that I use will be sufficient that you will be able to go out and find your own sources for the components and assemblies that I reference.
In the end, however, my goal is to have fun and to get you to try things with Arduino that haven’t been done before. And since a big part of having fun is to be able to do things quickly, the projects that we will undertake together will take just a few minutes to wire and program.
I hope that you will share your suggestions for tutorials and projects in comments section below. Don’t be afraid of being too outlandish; while I probably won’t go do a tutorial on building a remote trigger pull on a 12-gauge shotgun as part of a home-grown burglar deterrent/elimination system, your crazy idea could spur me onto something interesting. Let’s get some of those ideas going and see where they lead.
Next Article: Setting up your own Arduino development station.
Resources & Further Reading:
- https://www.youtube.com/watch?v=UoBUXOOdLXY Massimo Banzi: How Arduino is open-sourcing imagination
- http://arduino.cc/en/Products.Compare Different Arduino Boards
- http://shieldlist.org/ Arduino Shield List
- http://www.instructables.com/id/Intro-to-Arduino/
- https://learn.sparkfun.com/tutorials/what-is-an-arduino
Myke welcomes feedback, and you can email him at myke.predko@mimetics.ca or leave a comment below.
tags: Arduino for Makers, Arduino tutorial, c-Education-DIY, tutorial

AUAI is supported by: