
Robohub.org
Breaking it down with the DanceBot: Getting started with electronics
The MP3 DanceBot is a little robot that dances to the beat of your music. It’s a project that began in the summer of 2011 to introduce students to the basics of electronics and robotics. Students learn some of the basic components found in modern day electronic appliances while constructing a robot, which they can take home and continue to play and develop with.
Tutorial Structure
The entire tutorial takes about 10 hours to complete and is tailored towards students aged 12 and above.
The project will be presented in six tutorials:
- In the first tutorial (this one) we will be looking at how the DanceBot works, and will be covering how to read circuit diagrams.
- In the second tutorial, we will look at how to construct the DanceBot’s power supply.
- In the third tutorial, we will be building the DanceBot’s audio amplifier.
- In the fourth tutorial, we will build the DanceBot’s micro controller, digital line converter and H-bridge.
- In the fifth tutorial, we will assemble the DanceBot’s LEDs.
- And in the final part, we will look at the mechanical construction, and how to program your DanceBot to groove to your favorite tunes!
But before we get started, let’s take a look at the final product:
http://www.youtube.com/watch?v=XDDs63Z69Tc
Fun, funky and fabulous, but how does it work?
The picture below is a rough sketch of what we’ll be building in these tutorials. You’ll see some common elements found on many robots.
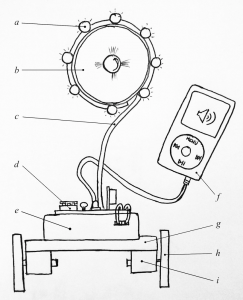
Some of the major components that you’ll find in the robot are:
- Light Emitting Diodes (LEDs)
- A speaker
- Thick gauge wire
- Electronics
- A battery pack
- An MP3-player
- A base
- Two wheels
- Two motors
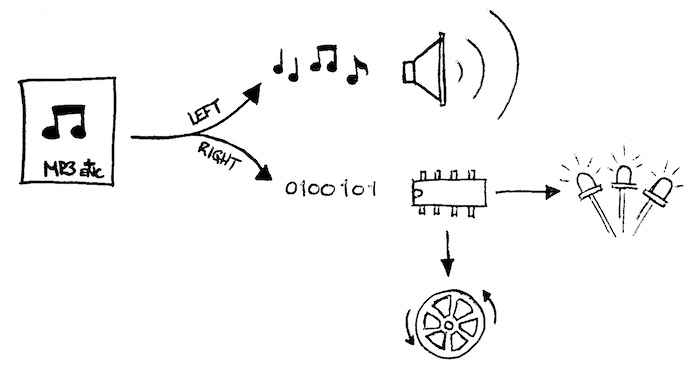
The key to how all of this works is the music that is played by your MP3-player. There are generally two channels (i.e. left-channel and right-channel) for music that you play on your MP3-player. These channels send music to your left and right ear, respectively. In the third part of the tutorial series, using the provided software, you will program dance moves into your favorite song by replacing the right-channel of music with binary-encoded dance moves! When your MP3-player is plugged in and you play your encoded song, the left-channel goes directly to an audio amplifier and plays the music through the speaker, while the right-channel goes to a small computer, which interprets the digital information as motor and light commands.
The electronic roadmap
A schematic is a drawing that shows us how electronic components connect together and where they are placed on the printed circuit board (PCB, the picture below). If you, like most people, don’t have the ability to print a circuit board, don’t worry, prototyping boards will work just fine!
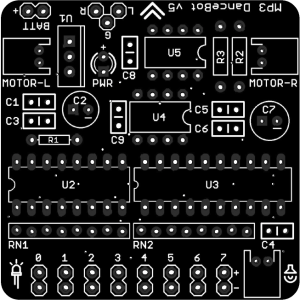
Before we start assembling the electronics, it’s important to know how to read the DanceBot’s schematic. You can download the schematics for this project here. Below you will find a list of common elements, which you can identify on the schematic and on the PCB.
| Component Type | Measurement Unit | Symbol | Picture |
|---|---|---|---|
| Resistor | Ohm (Ω) |  |
|
| Capacitor (polarized) | Farad (F) |  |
|
| Capacitor (not polarized) | Farad (F) |  |
|
| Light Emitting Diode (LED) | – | 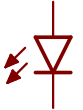 |
Now take a look at the schematic. Notice that beside each symbol in the schematic is a name (black) and a value (blue). The Name helps to identify the location of a part on the PCB (the picture above), while the value identifies the value of the part, as described in the table above.

In addition to name and value, some parts have a polarity. Be careful! This means you need to put them in the right way, otherwise things won’t work and could get damaged! Diodes have a polarity, and in this project some capacitors have a polarity too. In the next tutorial, where you will assemble the DanceBot’s electronics, we will warn you of any components with a polarity.
That’s it for now
In the next two tutorials, we will put together the DanceBot’s electronics, and then build its body and program some funky moves. If you would like to follow along in future tutorials, you’ll need to organize a few things. You’ll need to:
- Download the components list and buy the (few) components for the MP3 DanceBot Kit
- Make the mechanical base template
- Organise a soldering iron, solder, a hot glue gun, a multimeter and some side-cutters
If you don’t know where to start with these steps, a friend with electronics experience will definitely be able to help!
Once you have organized the above, take some time to learn how to solder and learn how to use a multimeter to check connections.
http://www.youtube.com/watch?v=jLt_xbyYq8Y
Stay tuned for the second tutorial!
tags: c-Education-DIY, DIY, education, Robohub focus on Robotics Education, tutorials

AUAI is supported by: